7 Aralık 2012 Cuma

Modern Neon Merry & Bright Christmas

To contact us Click HERE

It's the most wonderful party time of the year..... Christmas time! I love this holiday season with many festive parties and everyone decorates their house full Christmas delights! This year I wanted to create a collection that was a little different- I wanted something bright so I went with Neon colors to brighten your Christmas! They are so popular this year.... I just couldn't resist!

I know this new and fresh Christmas collection with bring Holiday Cheer and joy to everyone with a  Merry & Bright Christmas party!


For the background I created a color block backdrop with wrapping paper from Ikea... only .99 cents per role! Then add a modern twist by hanging a white faux deer head in the middle (from Z Gallerie) Then I strung our Merry & Bright banner from it's antlers. 

To add a little sparkle and softness to the table I made a little ornament bunting string with mini clear glass ornaments strung between each cake stand. (I search everywhere and I mean everywhere for clear ornaments. Michaels is the ONLY store that carries them! Just in case your looking for them a little heads up)

I strung the ornaments with pretty thin ribbon and knotted at various lengths in between allowing them to hang randomly. Then at the ends make a bow and attached to the cake stand with washi tape (I happen to have a very similar patten of washi tape that coordinated with my ribbon perfectly!)


Now for the Christmas desserts I know your waiting to see! I wanted them full of color and pattern- just full of life so everyone could resist and would want one of each!

Here are the sweets round up! I infused the desserts with the patterns from our collection like our polka dots, stripes and checkered prints. 

Beautiful snowflake cookies by Frog Prince She was a joy to work with and cookies were delicious!


Cake pops! Dipped in arrange of colorful chocolates sprinkled with mini hot pink sprinkles. Topped with our 2" party tags


Magical Reindeer Food: Chocolate covered popcorn with candies mixed in!


 For the sweets I wanted pattens and color to be apparent. We had polka dotted covered oreos, bright green macaroons with strawberry filling, hot pink and white checkered shortbread cookies (coordinating with one of our fun patterns in the collection), snowflake sugar cookies, cupcake topped with "sweet tarts" candy canes, cake pops and white chocolate popcorn "reindeer food". To gulp it all down with we had waters and a frothy Strawberry icecream punch. 


Our cupcake are topped with crushed candy canes (did you know they have such fun flavors of candy canes like sweet tarts, smarties and sour patch! I used the sweet tarts ones)


Shortbread checkered cookies topped with sugar. These were very easy to make. I used this recipe from our salted caramel shortbread cookies.


How to make checkered shortbread: 1. Color half of the dough with food coloring2. Make each cookie dough in a rectangle shape (form with wax paper)3. Cut each rectangle in half creating squares4. Stack opposite colors on top of each 5. Slight squish together so the squares connect.6. Slice and bake!


To bring more color in the dessert display I selected a clear tray and filled with mini peril sprinkles. I used a different color for each dessert to separate the macaroons, chocolate covered oreos and sugar cookies.


Macarons! They always look so pretty!


Again the snowflake cookies are by Frog Prince


The favorite dessert that caught everyones attention was our polka dotted chocolate covered oreos! They tasted as good as they looked too! I packages a pair of the in little bags and attached one of our party printable flags. The had some loose in front for those who only wanted one.


We also hade striped oreos too!


To down all the desserts with we had a frothy ice cream drink and waters


Our coordinating party invites are available in our shop here


12 Days of Holiday Decorations and packaging ideas: Day 1 Ruffle Fabric 2 tone Wreath

To contact us Click HERE

Tis the Season to decorate your house and make pretty packaged presents. I have 12 really fun and easy DIY that ANY level of crafter can do! 


Today to start the kick off to Holiday decorating crafts I created this DIY striped ruffle fabric wreath! It took only a hour and a half to create.... I had to design it too!


First you will need to select your fabric. I used ruffle fabric's lucky fabric, a two tone green fabric, but their red and white "peppermint" fabric would be darling too! Ruffle fabric is great because they will get your fabric to you quick! If you use my same size you will need 2 yards, but could make 3 or 4 wreaths out of the yardage. Any striped fabric would work though! I just loved the texture it gave the wreath.


Then you will then need to select your styrofoam wreaths. (Because I did the green fabric I chose a green wreath. If you do the peppermint or any other color I would select the white styrofoam wreath)


Next measure the circumference of wreaths. I used a 12" and 14" wreaths. If you do my sizes make one strip 48" long by 7" wide and one 39" long and 7" wide. To cut the ruffle fabric cut in between the ruffles like shown above. Cut the length so the ruffles are going horizontal


I found it easiest to place the wreath in your lap and and have it leaning on a table (i'm at my kitchen table here) That way it stays in place and is easy to work with.


Heat your glue gun and place a long line of glue about 2 or 3 inches on the center of the outer part of the wreath.


Roughly place the center of the fabric strip down and pat it making sure it is glued down. The ruffles will be going vertical.


Fold back the section that is not glued down and and place another long strip of glue. Repeat until you are at the end


Where the 2 ends meet you might need to trim a ruffle or two off.... It's better to have to trim then not enough.


The fabric will be glued to the outer edge. Fold over the ruffles and see where it hits on your wreath. Then glue the inner ruffles the same by a strip of hot glue. When the first side is tacked dow, match up your first ruffle and tack every other ruffle down with a dot of hot glue.


Repeat with your second tier of wreath.


Glue top wreath to the bottom wreath where they connect. Add a bow and you done! Hang outside or in your house!


Day 2 Tissue Paper Garland

To contact us Click HERE


Day 2: Tissue Paper garland. These are such fun garlands to make! All you need is twine, tissue paper, rubber cement and a circle punches. For $5 you could make oodles of garlands, of all different sizes and colors. 

With these garlands I did a random pattern with 2 different circle sizes and colors.

1. Punch out circles with tissue paper (If your punch is tearing the circles put a piece of scratch paper so it punches through the tissue paper first then your scratch piece of paper. This can happen because tissue paper isn't strong enough to withhold the pressure of the punch alone)

2. Place rubber cement glue on one of the circles place the twine on top of the glue then place another circle and press together

3. Repeat and your done! Simple as that!


You can also use our fun garland to brighten up a package

Kellogg's Rice Krispies Treats Recipe

To contact us Click HERE
Kellogg's Rice Krispies Treats Recipe
Rice Krispie Treat Recipe Ingredients:
  • 1/4 c. butter
  • 1 pkg. (10 oz. about 40 regular) marshmallows or 4 c. miniature marshmallows
  • 6 c. Kellogg's Rice Krispies cereal

Rice Krispie Treat Recipe Instructions:
First of all melt butter in large saucepan over low heat. And then add marshmallows and stir until completely melted. Next is to remove the heat. Add Kellogg's Rice Krispies cereal. Stir until well coated.

Using buttered spatula or waxed paper, press mixture evenly into buttered 13 x 9 x 2 inch pan. Cut into squares when cool. Enjoy the rice krispies !
instant-rice-krispie-treat-recipe

30 Kasım 2012 Cuma

Slow Cooker Bourbon Baked Beans

To contact us Click HERE


I bought bourbon for the first time. I wasn't sure what kind to buy, but chose the Jim Beam because I recognized the name and it was on sale.

and then I made the most awesome baked beans known to man.

I checked with Shirley--- distilled alcohol is gluten free, yet some people react to anything made with grains. If you know you react, this might not be a good recipe for you. Here's a bit more on that from Shirley, at Gluten Free Easily.

The Ingredients.
serves 8-10 as a side dish, 4-6 as main course


1 pound pinto beans, soaked overnight and then drained and rinsed
      (if you don't have time to soak overnight, no problem. Put them in a large pot, and cover completely  
       with water. Bring to a rapid boil for 10 minutes, then turn off stove and cover pot. Let your beans sit 
        for 1 hour, then drain water and put beans into crockpot)
8 ounces bacon, cooked, crumbled, and drained
1 onion, diced and browned
4-6 cloves garlic, diced and browned
1 cup prepared barbecue sauce (read labels carefully if avoiding gluten)
1 cup lightly packed brown sugar
2 tablespoons molasses
1 tablespoon ground mustard
2 cups chicken broth
1 cup bourbon

The Directions.

Use a 6-quart slow cooker. In a large skillet on the stovetop (or use your Ninja!) brown the bacon, onion, and garlic until the bacon is crisp and the fat has been rendered. Discard the fat, and pour the bacon mixture into an empty slow cooker.
Add the soaked and drained pinto beans. Now add the brown sugar, molasses, and dried ground mustard. Stir in chicken broth and bourbon.

Cover, and cook on low for 10 hours, or until beans are soft. If you live in a high-altitude, your beans may take longer to cook. If you prefer to cook on high, check after 6 hours or so.


I served our beans with homemade corn bread made from masa.


This is the recipe I used:

Preheat oven to 425° and lightly butter a cake pan. In a mixing bowl, combine:
1 1/2 cups masa
1/2 cup all purpose flour (I use Pamela's Baking Mix as my gluten free all purpose flour)
2 teaspoons baking powder
1 teaspoon kosher salt
1 tablespoon white sugar

wet ingredients:
1 1/3 cups milk
1/2 stick melted butter (1/4 cup)
2 eggs

Mix the dry ingredients together until well-incorporated and the baking powder isn't clumpy. You can sift, if you'd like, but that's kind of a lot of work for a quick cornbread. I end up using my fingers sometimes to break up clumps.
Then mix in the wet ingredients --- use a fork or a whisk, no need to use a machine. Pour batter into pan -- it'll be quite thick, and you may need to shove it around to get it in place.
Bake at 425° for about 20 minutes.

The Verdict.

These beans are perfect. I am SO looking forward to the next potluck --- they had tons of flavor and smelled absolutely amazing. All 5 of us licked our bowls clean. I'm really very pleased with this recipe, and I think you will be, too. If you don't want to use bacon, I bet a saved ham-bone/hock would be *perfect*.
The masa cornbread was an experiment. I didn't have cornmeal in the house and really wanted cornbread. This is quite tasty-- it's nowhere near as sweet as traditional cornbread and tastes "cornier" if that makes sense. This would be a more traditional flavor that the pioneers or Native Americans would have had. 

at least that's what I told the kids.


a few announcements:

~ Ninja has *very generously* increased my cooking system package to now include the roasting kit, the baking kit, the mini warmer, the travel tote, free shipping, and a 5-year warranty for the Holiday season. I've been told this is the best package deal offered, and is better than the infomercial offering. 

~ we are still hosting giveaways daily on the giveaway page! Click on over and enter to win!

~ Amazon has my Totally Together: Shortcuts to an Organized Life book on sale. Make 2013 the best year yet by getting completely (and totally!) organized. 

~ I'm going to be speaking next month at BlogHer PRO on pricing and proposals. I can not believe how much my life has changed ever since I made that silly resolution in 2008, and I am so very (very) thankful. I am always happy to share blogging info and what has/hasn't worked for me, and think this will be an extraordinary conference. 

Have a wonderful day!!


TweetPinitAdd this recipe to ZipList!Print Friendly and PDF

Vegan Peach Ice Cream

To contact us Click HERE
PinitPrint Friendly and PDF
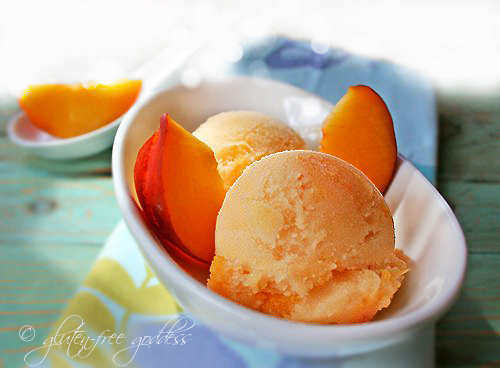
Vegan peach ice cream - dairy-free and gluten-free
Gluten-free dairy-free peach ice cream.

A small gift for you this weekend. Some cool, frosty, non-dairy peachy goodness. A vegan ice cream recipe for the sticky dog days of late summer. Wait. Is it August already? Good goddess, the summer is careening by. It's true what they say about the concept of time. It speeds up and gets fluid as you get, um, shall we say, older. Seasoned.

One might even venture, weathered.

During your ritual morning walk your husband turns to you and mentions a moment from yesterday and the dirt path beneath you starts to swim (not that swimming surfaces are all that unusual out here in the shimmering southwest sun).
You ask, Wait. Was that yesterday? 
And he thinks a minute. Wait, he says. Friday? 
You hear the brittle dryness of the desert wind. The roar of the loud cobalt sky. There are red and sienna stones beneath your feet. The same stones as yesterday, last week, last year.
That was last week, you offer gently, shaking your head in a spin cycle of empathy and disbelief and astonishment. 
Dude, he says. Recalculating.
Tell me about it, you sigh.
Weeks morph into days.

How about some peach ice cream for breakfast?

Vegan peach ice cream - dairy-free and gluten-free
Cool, frosty, peachy dessert.

Vegan Peach Ice Cream- a dairy-free frozen dessert recipe

I prefer using coconut milk in my non-dairy ice cream recipes (rice or almond milk will not be quite as creamy). If you non-vegans can use dairy moo-cow milk, go right ahead. I'd use half milk and half cream. The higher the fat, the creamier the result. It's a treat after all.
You'll need:
About 4 cups of peaches, peeled and cut up into pieces and divided in half1 14-oz can coconut milk
2 teaspoons organic virgin coconut oil (especially if the coconut milk is not full fat) 1/2 to 3/4 cup organic light brown sugar, to taste1 teaspoon bourbon vanilla

Instructions:

In a saucepan heat half the peaches (2 cups) with the coconut milk, coconut oil, and sugar until the peaches are softened and the sugar is melted (this takes less than five minutes). Remove from heat and cool.
Pour the mixture into a blender and blend till smooth.
Combine the remaining peaches with the peach-coconut milk mixture. Add the vanilla. Stir and cover. Refrigerate for two hours or so- until the mixture is cold.
Churn the peach mixture in your favorite ice cream maker, as per manufacturer's instructions.
Or pour the mixture into a freezable container and freeze; check every 15 to 20 minutes or so and stir the mixture to keep ice crystals from forming.
Makes a quart of peachy vegan ice cream.

Recipe Source: glutenfreegoddess.blogspot.com
All images & content are copyright protected, all rights reserved. Please do not use our images or content without prior permission. Thank you.
Vegan Peach Ice Cream