31 Aralık 2012 Pazartesi

Spinach & Pea Shoot Salad with Dill Tuna & Quinoa

To contact us Click HERE
A fresh, healthy salad topped with tuna & quinoa

Before I tell you about this fabulous salad, I just need to say... I'm sitting in my apartment, excited like a giddy teenager, counting down the hours until Friday morning. Why am I acting like a crazy person you may be wondering?

Because the Nourished Food Blogger Conference is only 60 hours away!

That's right, at 6am on Thursday I will be hopping on a plane, headed for Chicago, to join my fellow gluten-free and allergy-free food bloggers! We are going to learn, meet, talk, network, eat, blog and laugh (hopefully a lot).

This is super exciting for me, because it's the first event I have been to that is centered on gluten-free food blogs. The agenda is jam packed, with the entire day focused on making your blog better and taking it to the next level! We're going to talk about improving your writing, honing your recipe development, building a brand and experimenting with food photography.

Doesn't that just sound amazing?

See the Full Recipe »

Avocado & Mango Quinoa Sushi

To contact us Click HERE
A new way to enjoy Vegetarian Rolls.

I'm living the life. Although I woke up at 4:15 this morning, right now I'm sitting in a chaise lounge, soaking up the sun, in the Windy City. My Vitamin D deprived skin couldn't be happier, it's singing out for joy. Oh how I've missed the sunshine and warm weather!

I could seriously get used to this.

If you read my last post, then you know that I'm not here just to sunbathe. Tomorrow is the Nourished Food Blogger Conference! Yes, it's finally here. The weekend I've been counting down to for the past three months. I can't believe it! It's hard to contain my excitement.

See the Full Recipe »

We're moving!!

To contact us Click HERE

I have big news: the Queen of Quinoa is moving!

Make sure all your links are updated - we're going to be living at queenofquinoa.me!

I'm sorry if it seems like I've been a bit MIA lately, but I've been busy getting my new site up and running. I'm super excited about this move and can't wait to see you all over there! Please bear with me as we work out the kinks and I would love to hear what you think.

In case you missed them, here are my latest posts:


Detox Salad {gluten-free & vegan}


Balsamic Strawberry & Rhubarb Crisp


Mango Cardamom Juice


Orange Creamsicle Cupcakes

To contact us Click HERE

orange creamsicle cupcakes5

Oranges and cream is such a blissfully fresh and excitingly delicious flavor combination. It’s one of my favorite combinations. Let me rephrase that, basically any fresh fruit with cream is my favorite combination. Which may explain my weakness for orange creamsicle flavored anything. I saw the orange cupcakes at Martha Stewart and decided it would be perfect for these.

I made a few small changes such as removing the vanilla beans (simply because I wanted the orange flavor to shine through), then I increased the orange flavor by adding orange extract and increasing the orange zest. I also replaced the frosting with my own Vanilla Buttercream because it’s my favorite buttercream recipe, it even reminds me of ice cream so I figured it would make an excellent fit. These cupcakes are simply fantastic. I love how the cupcake recipe contains heavy cream. It’s not too often you come across a cupcake recipe that contains cream in the batter. It gives these cupcakes such a delightful texture, with a dense and perfectly moist crumb. This is a charming cupcake that may just become one of your favorites. Enjoy!

orange creamsicle cupcakes7

orange creamsicle cupcakes6

Print Orange Creamsicle Cupcakes

Prep Time: 30 minutes

Cook Time: 25 minutes

Yield: 14 cupcakes

Orange Creamsicle Cupcakes

Ingredients

  • 2 cups all-purpose flour
  • 1/4 tsp baking powder
  • 1/4 tsp baking soda
  • 1/4 tsp salt
  • 1/2 cup salted butter, softened
  • 1 cup granulated sugar
  • 1 1/2 Tbsp finely grated orange zest (from about 1 1/2 oranges)
  • 2 large eggs
  • 3/4 cup heavy cream
  • 1/4 cup fresh orange juice
  • 1 1/2 tsp orange extract
  • 1 tsp vanilla extract
  • Vanilla Buttercream Frosting*

Directions

  • Preheat oven to 350 degrees. In a mixing bowl, whisk together flour, baking powder, baking soda and salt, set aside. In a large mixing bowl, using an electric hand mixer set on medium-high speed, blend together butter, granulated sugar and orange zest until pale and fluffy, about 3 - 4 minutes. Mix in eggs one at time, blending until combine after each addition. Measure out cream into a liquid measuring cup, stir in orange juice, orange extract and vanilla extract. With hand mixer set on low speed and working in 3 separate batches, blend in flour mixture alternating with cream mixture, beginning and ending with flour mixture and mixing just until combine after each addition. Divide batter among 14 paper lined muffin cups, filling each cup 3/4 full. Bake in preheated oven 23 - 25, rotating muffin tins once halfway through baking, until toothpick inserted into center comes out clean. Remove from oven and allow to cool several minutes before transferring to a wire rack to cool. Cool completely then frost with Vanilla Buttercream Frosting and garnish with an small orange slice if desired (just before serving). Store in an airtight container at room temperature.
  • *If you want the pilled high amount of frosting then you will likely want to make about 3/4 of the Vanilla Buttercream recipe. If you don't want a ton of frosting then 1/2 of the recipe should be enough.
  • Recipe source: cupcake recipe - adapted from Martha Stewart, buttercream frosting - Cooking Classy
Schema/Recipe SEO Data Markup by ZipList Recipe Plugin2.2http://www.cookingclassy.com/2012/12/orange-creamsicle-cupcakes/

Chicken Alfredo Pizza

To contact us Click HERE

chicken alfredo pizza2

Have you tried chicken alfredo in pizza form yet? If not, I’d say to you it’s a must. I love chicken alfredo pizza. I may not have ever been so keen to try it if it weren’t for my husband. He has a weakness for alfredo both in pasta and pizza form, so a few years ago I tried his at a restaurant and fell in love. Not only did I fall in love but I started making it at home and loving it equally as much, if not more than what we’d get in the restaurants.

There are a few options when making this pizza. You obviously can make your own crust, purchase one from the grocery store, or most of the time what I do is buy a large one or a few small ones from the local pizzeria. If you are making your own crust and don’t have a good recipe, I really like the Cook’s Illustrated recipe for pizza dough. Like I said though, most of the time it’s just easier for me to get a pre-made dough from the local Pizzeria, it’s always delicious with a perfect fluffy and chewy texture. The other option for this pizza is to cook it on the grill, which I do most of the time, especially in summer months because I just love the flavor of grilled pizza (if doing so, I’d recommend doing small pizzas, grilling one side of the dough first then remove, rotate and top – toppings should go on cooked side, then return to grill and continue grilling until golden and cheese is melted). You can also switch up the toppings to suit your taste, such as removing green onions if you don’t like them (I’d recommend replacing them with a lesser portion of fresh parsley if you aren’t using the green onions), adding slices mushrooms or spinach or make a Cordon Bleu version by adding ham and some Swiss cheese to the toppings as well. However you top it, I hope this pizza becomes one of your new favorites too. Enjoy!

chicken alfredo pizza8
chicken alfredo pizza

chicken alfredo pizza5 copy

Frugalista tip: regrow your green onions in water in your windowsill in just 2 weeks! Simply cut off and use the green portion (leaving about 3 inches of the white root portion), then place the roots in a glass or jar and fill with water and place in windowsill. This is the result I got in just under 2 weeks of winter sunlight in my windowsill. Pretty crazy eh? An interesting tip I read about in Cook’s Illustrated. You can actually do it twice with the same onion roots. I should have taken a before photo but at the time was mostly experimenting =). It works!

green onions

Print Chicken Alfredo Pizza

Prep Time: 25 minutes

Cook Time: 15 minutes

Chicken Alfredo Pizza

Ingredients

  • 1 lb pizza dough, store-bought or homemade
  • 1 1/2 cups cooked or grilled, shredded chicken
  • 2 Tbsp butter
  • 1/4 tsp garlic powder
  • 1/8 tsp onion powder
  • 1 Tbsp flour, plus more for dusting
  • 1/2 cup + 2 Tbsp heavy cream
  • 1/2 cup + 2 Tbsp whole milk
  • 2 oz finely shredded Parmesan cheese (1/2 cup)
  • Salt and freshly ground black or white pepper, to taste
  • cornmeal, for dusting
  • 4 oz shredded Mozzarella cheese (1 cup)
  • 6 slices bacon, cooked and chopped
  • 1 Tbsp extra virgin olive oil
  • 1 1/2 Tbsp chopped green onions

Directions

  • Preheat oven to 425 degrees. Place a pizza stone in center of oven to heat while preparing toppings for pizza (for at least 30 minutes).
  • Melt butter along with garlic powder and onion powder in a medium saucepan over medium heat. Whisk in flour and cook for 1 minute, stirring constantly. While whisking vigorously, slowly pour in cream and milk. Bring mixture just to a gentle bubble stirring constantly. Allow mixture to gently boil for 20 seconds, stirring constantly. Remove from heat, add in Parmesan cheese, season with salt and pepper to taste then return to warm heat and stir occasionally until ready to use.
  • To assemble pizza:
  • On a floured work surface, flatten, stretch and shape pizza dough into a 13 to 14-inch round, while creating a thicker outer crust. Sprinkle a wooden pizza peel with flour and cornmeal and transfer shaped dough to pizza peel, reshaping dough as need. Remove pizza stone from oven, sprinkle lightly with cornmeal then carefully slide shaped pizza dough from pizza peel onto hot pizza stone. Pour half of the Alfredo sauce over dough round, then use the back of a spoon to spread into an even layer coming within about 1-inch of the edge. Sprinkle shredded chicken over sauce layer, then pour remaining sauce evenly over chicken. Sprinkle top evenly with Mozzarella cheese then sprinkle with chopped bacon. Brush outer crust with olive oil and season crust lightly with a pinch of garlic powder and salt. Bake in preheated oven 14 - 16 minutes until crust is nicely golden. Remove from oven, garnish top evenly with green onions, cut into slices and serve warm.
  • Recipe Source: Cooking Classy
Schema/Recipe SEO Data Markup by ZipList Recipe Plugin2.2http://www.cookingclassy.com/2012/12/chicken-alfredo-pizza/


27 Aralık 2012 Perşembe

Creamy White Chicken Lasagna Roll Ups

To contact us Click HERE

Two of the most popular recipes that I’ve posted are my traditional Lasagna Roll Ups and the Caprese Lasgana Roll Ups, both of which are covered with a tomato sauce. This time around I wanted to do things a little different. I decided to go quite the opposite by using a white sauce and chicken. I wanted something similar to Chicken Alfredo but also different. I keep seeing this recipe on Pinterest and every time it has my mouth watering, so I decided to use it as the base recipe for these and adjust it to be created in roll up form. I changed a few ingredients as well as omitted some things. I left out the artichokes and sun dried tomatoes (if you wanted to add them to this dish you definitely could, just be sure to chop them into very small pieces so they will roll well), I replaced the fresh basil with dried basil and also reduced the amount, then I added fresh parsley because I think white sauce and parsley just go together. I also added in some Romano cheese and a small amount of onion powder to add a little more flavor.
This dish was amazing! It was incredibly creamy, hearty and filling. It was subtly flavored but had just enough flavor to keep me interested. The flavors of the cheese all melded deliciously together while perfectly complimenting the chicken. And the herbs just gave it some fresh Italian flavor.
Someone mentioned in the reviews of the recipe from Kraft, that these reheat well so I’m hoping they freeze well, because I love make ahead meals I can warm when I’m short on time. Enjoy!

Print Creamy White Chicken Lasagna Roll Ups

Yield: 9 servings

Creamy White Chicken Lasagna Roll Ups

Ingredients

  • 9 lasagna noodles
  • 2 cups boneless, skinless chicken breast, cooked and shredded*
  • 8 oz. shredded Mozzarella cheese, divided (2 cups)
  • 1 oz. finely shredded Parmesan cheese (1/4 cup)
  • 1 oz. finely shredded Romano cheese (1/4 cup)
  • 1/4 cup chopped fresh parsley
  • 2 (8 oz) pkg. cream cheese, softened
  • 1 cup milk
  • 1 1/2 tsp dried basil
  • 1/2 tsp garlic powder
  • 1/2 tsp onion powder
  • salt and freshly ground black pepper, to taste

Directions

  • Preheat oven to 350 degrees. Prepare lasagna noodles according to the directions listed on package, drain pasta and align noodles in a single layer on a large sheet of wax paper.
  • In a mixing bowl toss together shredded chicken, 1 cup Mozzarella cheese, Parmesan cheese, Romano cheese and 3 Tbsp fresh parsley, set aside.
  • In a separate mixing bowl using an electric hand mixer set on low speed, blend cream cheese until smooth, then mix in milk, dried basil, garlic powder, onion powder and season with salt and pepper to taste (I hardly used any salt and 1/2 tsp pepper). Pour half of the cream cheese mixture into the chicken mixture and toss to evenly coat, reserve remaining cream cheese mixture.
  • Spread 1/3 cup of the chicken mixture into an even layer along the length of each cooked lasagna noodle then roll noodles to opposite end. Spread 1/4 cup of the remaining cream cheese mixture along the bottom of a 9 x 9-inch dish or along 2/3 of a 13 x 9-inch dish (I tried fitting it into an 8 x 8 and it just wasn't going to happen so a 9 x 9 should work. I don't own a 9 x 9 so I had to compromise and use a 13 x 9 and just use 2/3 of the dish). Align pasta snugly and side by side in baking dish - 3 rows of 3. Cover each lasagna roll evenly with remaining cream cheese mixture, being sure to cover tops of pasta entirely so they don't dry while baking. Sprinkle tops evenly with remaining 1 cup Mozzarella cheese. Bake in preheated oven 25 - 30 minutes until heated through and cheese has melted. Sprinkle top evenly with remaining 1 Tbsp chopped fresh parsley. Serve warm.
  • *I like to slow cook the chicken, it seems like the easiest method and always yields tender results. To cook, I poured 1 can low-sodium chicken broth over 2 medium chicken breasts in the slow cooker and cooked 6 hours, then removed and shredded into very small pieces.
  • Recipe Source: adapted slightly from Kraft
Schema/Recipe SEO Data Markup by ZipList Recipe Plugin2.2http://www.cookingclassy.com/2012/12/creamy-white-chicken-lasagna-roll-ups/

Alfajores {AKA Dulce de Leche Sandwich Cookies}…and Welcome to the New Site!

To contact us Click HERE

alfajores3

Wahoo! Yipee! At last I’m no longer a blogspot! I need to give a big thank you to Cre8d Design. I couldn’t have worked with a better design company to create this new blog! They are so very talented and amazing at what they do. They were so friendly and efficient to work with and they created exactly what I was looking for. They built this site from scratch, so it was customized to be just what I wanted (can you tell I like the Martha Stewart blue and fancy things?). To any of you looking for a blog or website designer I would highly recommend Cre8d Design! You won’t be disappointed. Please have a look around the new Cooking Classy. My new favorite pages, the Recipes and Recipe Box. My recipes finally have some real organization to them! And with the Recipe Box from Ziplist, you can save recipes, not just from my site but many others (such as Martha Stewart, Gooseberry Patch and Simply Recipes). It has other wonderful features, such as creating a shopping list, so be sure to check it out. Some other wonderful and highly needed features are the print button and pin button along with each recipe. Now you can print recipes without getting pages of unnecessary images and information. You can also search my site with a more friendly Google search box which is displayed in the upper right. Also, the site is now configured to automatically update facebook and Twitter (I hardly ever updated them in the past), so please follow along!

I’ve been posting to Cooking Classy for just over a year and I’m so grateful for the way it has grown and for the readership from those of you following. This blog has unintentionally turned into a work from home job for me. It is a job I so passionately love, which I am also very grateful for. I hope you all continue to follow along and love what you find and create from Cooking Classy.

Seeing as a celebration was in order for such an exciting website launch, I decided it was time to post Alfajores. Many of you may be asking, what are Alfajores? Alfajores are a traditional cookie found in Argentina, other parts of Latin America and Spain. I discovered these gourmet confections thanks to my Husband whom served a 2 year LDS Mission in Argentina. When we first got married I really wanted to impress him and make some fancy Argentine dishes and these were one of them. I have loved them ever since. They most definitely are one of my favorite kinds of cookies. I can’t understand why these delicious, caramel, coconut and lemon flavored, shortbread like cookies aren’t popular here in the United States. These cookies melt in your mouth! Some people refer to them as Dulce de Leche Sandwich Cookies but shouldn’t we give them their proper name? Besides it’s so much more fun to say, alpha-HORE-ays, than that other long name given. I made this recipe to be a little bit more than the traditional Alfajor. I added in some extracts and chose to add various toppings rather than just going with a plain, un-coated Alfajor. Much of the time you will find them rolled in coconut (which is definitely one of my favorite topping choices) but I like to give people options, and how could I leave out sprinkles? Now let’s celebrate, and go make Alfajores!

alfajorestext1

alfajores5

Print Alfajores

Prep Time: 30 minutes

Cook Time: 10 minutes

Total Time: 1 hour, 40 minutes

Yield: 2 dozen

Alfajores

Ingredients

  • 1 1/4 cups cornstarch
  • 1 cup all-purpose flour
  • 1 tsp baking powder
  • 1/4 tsp salt
  • 10 Tbsp butter, softened
  • 3/4 cup granulated sugar
  • 1 1/2 tsp lemon zest
  • 3 large egg yolks
  • 1 tsp vanilla extract
  • 1/4 - 1/2 tsp coconut extract, optional (use 1/2 tsp for more coconut flavor)
  • a few tsp lemon juice, as needed
  • 1 can Dulce de Leche (I've used homemade before too)
  • Various toppings for coating*

Directions

  • In a mixing bowl, whisk together cornstarch, flour, baking powder and salt, set aside. In the bowl of an electric stand mixer fitted with the paddle attachment, blend together butter and sugar on medium speed until creamy, about 30 seconds. Mix in lemon zest. Add in egg yolks one at a time, mixing after each addition until well blended. Mix in vanilla and coconut extract. With mixer set on low speed, slowly add in dry ingredients and mix until combined and dough starts to come together, adding a few tsp lemon juice if needed (dough will be fairly dry, I didn't need to add it but I tried adding a little bit to the second half of the dough to compare cookie texture. Just note it will increase the lemon flavor in the cookie). Shape dough into a ball, cover ball with plastic wrap and refrigerate 30 minutes to 1 hour until dough is easy enough to work with.
  • Preheat oven to 350 degrees. Roll chilled dough out between to large sheets of parchment or wax paper to 1/6-inch thickness (I worked with half the dough at a time). Using a 2-inch round cookie cutter (sometimes I use a heart shape instead), cut dough into circles then using a wide knife (such as a Santoku knife), slide knife along the bottom of the cutout cookie (or you can just pick them up, I just always found I get less breakage using a knife) and transfer cookie to a Silpat lined or buttered cookie sheets (fitting 15 per sheet) bake in preheated oven for 10 - 11 minutes. Allow cookies 5 minutes to cool on cookie sheet before transferring to a wire rack to cool. Cool cookies completely then spread a layer of Dulce de Leche over the bottom side of one cookie, then sandwich to the bottom side of another cookie. Spread a thin layer of Dulce de Leche around the round edge of the cookie, then roll in desired topping. Store cookies in an airtight container at room temperature.
  • *Here are a few of the toppings I like to use:
  • sweetened coconut flakes (I like to grind it a little bit in the food processor to a smaller size, which is an optional step)
  • toasted coconut flakes (I used a bag of toasted desiccated coconut I had)
  • finely chopped pecans, toasted if desired
  • sprinkles
  • grated white, milk or semi-sweet chocolate
  • Alternately you don't need to coat the edges at all, you can simply just fill the centers with Dulce de Leche. If desired you can dip to coat or drizzle cookies in white, milk or semi-sweet chocolate.
Schema/Recipe SEO Data Markup by ZipList Recipe Plugin2.2http://www.cookingclassy.com/2012/12/alfajores/

alfajores4text

Light Fettuccine Alfredo

To contact us Click HERE

light fettucine alfredo
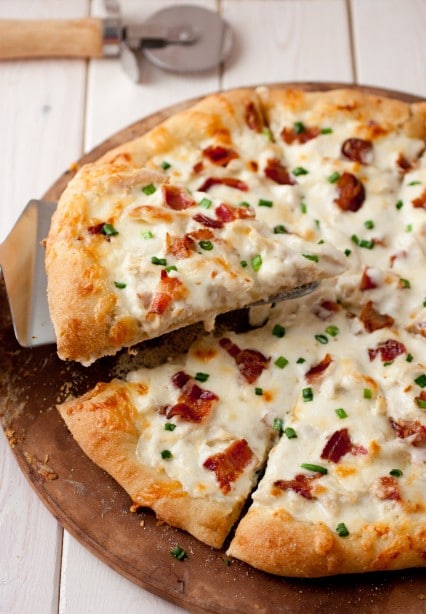
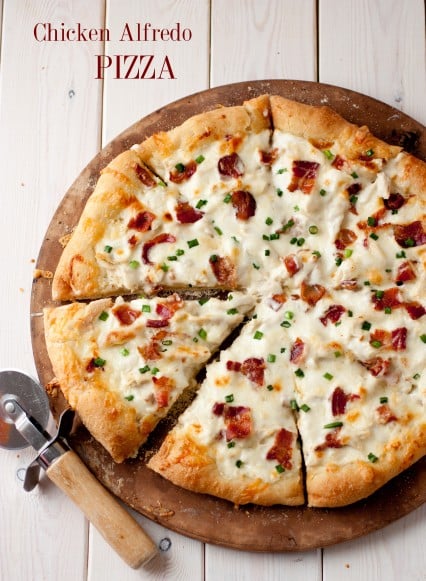
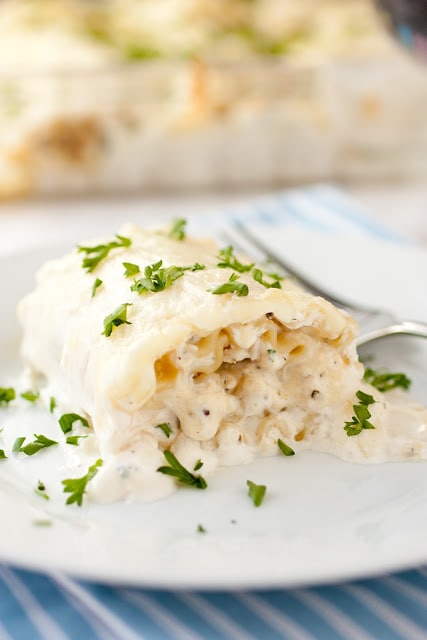
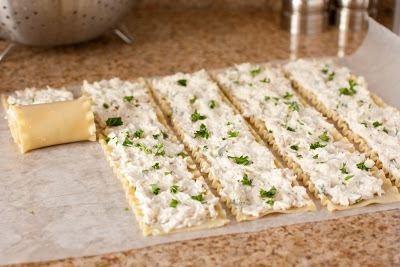
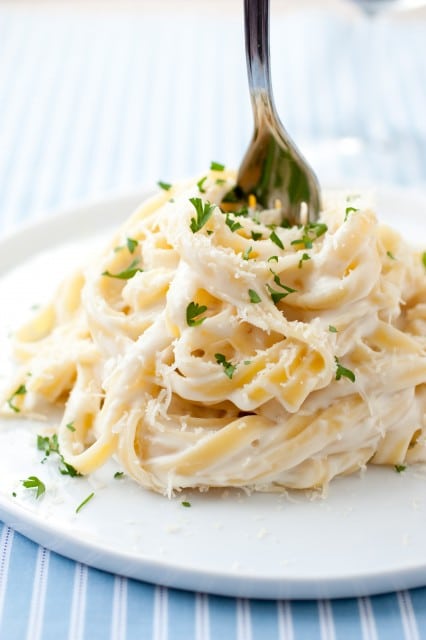
So we all know the holidays can be pretty unforgiving when it comes to diet friendliness. I know for me it’s easy to say, well the holidays come just once a year, so I deserve to celebrate and indulge a little. I’ve earned it. Personally, I think we should indulge a little during the holidays, it gives us more reason to look forward to them. I’m also a believer in balance when it comes to eating. I like my healthy foods and I love my indulgent foods. The healthy ones keep me, well healthy, and the indulgent ones keep me happy. Does that make me an emotional eater :)? I’m a woman what can I say? Anyway, I love love love Fettuccine Alfredo, but with it’s heavy packing of calories and fats I don’t like to make it more than once a month. Yet, I do want it more than that so I decided to create a healthier sister recipe, a more figure friendly Light Fettuccine Alfredo. No this is not a fat free recipe. I think it would be impossible to make a fat free version because that would require the use of absolutely no Parmesan cheese,  and we couldn’t considered that Fettuccine Alfredo now could we?

When creating this recipe, I decided I couldn’t omit the cream entirely. Rather, I replaced the majority of the cream used in your average Alfredo sauce with low-fat milk and just a few tablespoons of cream. I also reduced the amount of Parmesan compared to your average Alfredo sauce then added 1 tsp lemon juice to mimic the tang from the lack of additional Parmesan. The Neufchatel cheese was added to give the sauce a smooth, rich and creamy texture without upping the calorie and fat count significantly. Then to finish I garnished the coated pasta with fresh parsley to add some freshness and light sprinkling of Romano cheese to add one more layer of flavor (and I love the flavor pairing of Romano and Parmesan together so I couldn’t resist). The final calorie count of this dish is a fair and balanced 370 calories with 14 grams of fat which is so much less than it’s unhealthier competitor, yet it was seemingly just as creamy. Granted you may likely want more than 1 serving (I went with the serving size according to pasta serving size listed on the package) but even then, you are far better off than a full fat Alfredo. Enjoy!

Print Light Fettuccine Alfredo

Cook Time: 20 minutes

Total Time: 20 minutes

Yield: Serves 4

Calories per serving: 370

Fat per serving: 14 grams

Light Fettuccine Alfredo

Ingredients

  • 8 oz. fettuccine pasta, uncooked
  • 1 1/2 Tbsp butter
  • 1 1/2 Tbsp flour
  • 1 1/4 cups milk
  • 2 Tbsp heavy cream
  • 1 tsp lemon juice
  • 1/2 tsp salt, or to taste
  • 1/8 - 1/4 tsp garlic powder, to taste
  • 1 1/2 oz. freshly, finely shredded Parmesan cheese (1/4 cup + 2 Tbsp slightly packed)
  • 2 oz Neufchatel cheese (aka 1/3 less fat cream cheese), diced into cubes
  • freshly ground white or black pepper, to taste
  • chopped fresh parsley for garnish, optional
  • finely shredded Romano cheese for serving, optional (not added to calorie count)

Directions

  • Directions:
  • Cook pasta according to directions listed on package. Meanwhile, in a medium saucepan melt butter over medium heat. Once fully melted mix in flour and cook, whisking constantly for 2 minutes. Gradually add in a little milk at time, whisking vigorously until smooth after each addition. Stir in cream, lemon juice, salt and garlic powder. While stirring constantly to prevent lumps from forming, cook sauce until mixture thickens and begins to gently bubble.
  • Reduce heat to low, add in Parmesan cheese and Neufchatel cheese and stir until cheese has melted. Stir in a few tbsp pasta water to thin sauce if desired. Drain cooked pasta well (DO NOT rinse pasta with water or the pasta sauce wont stick) then pour drained pasta into sauce and toss to evenly coat. Serve immediately garnished with ground pepper, optional parsley and Romano cheese.
Schema/Recipe SEO Data Markup by ZipList Recipe Plugin2.2http://www.cookingclassy.com/2012/12/light-fettuccine-alfredo/

No Bake Cheesecake Mousse with Raspberry Sauce

To contact us Click HERE

cheesecake mousse19

With Christmas just around the corner I’ve decided an elegant yet simple dessert was in order. I’ve been wanting to make a no bake cheesecake for a while and I figured this was the perfect time seeing as Christmas is just a few short days away! It gave me the perfect opportunity to create a festive dessert with it’s vibrant red and green color combination.

There are many no bake cheesecake recipes out there which look fantastic. Some of them call for one ingredient in particular that I’m not so fond of,  frozen whipped topping (aka Cool Whip). I just really don’t like the stuff. Yes, I will eat it but I would so much rather have the real thing. I don’t even know what half the ingredients it contains are, which may explain its strange after taste. So, I decided to create my own no bake cheesecake recipe using real cream instead. I also decided the texture of this is more like a Mousse than a cheesecake, hence the name I chose. Honestly it is now hard for me to decide which I like better, the baked cheesecake with far more effort and longer chilling times or this No Bake Cheesecake Mousse. I love it’s delicately smooth, fluffy and even creamy texture. It is so much lighter and fluffier than your average dense and heavy cheesecake. This has just the right amount of richness and the perfect balance of sweet to go along with the slight tartness of the raspberries. This is one simply divine dessert you you won’t easily forget. I may just dream daily about this stuff =).

Once you see the ingredients in the Cheesecake Mousse you will probably ask, why the corn syrup? To answer that, my Grandma taught me that just a bit of corn syrup works as a good stabilizer for whipped cream. So, I added it in to help stabilize the mixture so it doesn’t loose all that air and fluff that was whipped into it. Note that you may likely have just a bit of extra raspberry sauce left over (I adapted the raspberry sauce recipe from my White Chocolate Cheesecake with Raspberry Sauce). I myself had just a bit left over but I’m sure I will find a good use for it, such as blending it into a smoothie, drizzling it over my morning oatmeal, or maybe just drinking it =). Merry Christmas everyone! Enjoy!

cheesecake mousse16
cheesecake mousse17

Print No Bake Cheesecake Mousse with Raspberry Sauce

Prep Time: 25 minutes

Total Time: 2 hours, 25 minutes

Yield: 4 Servings

No Bake Cheesecake Mousse with Raspberry Sauce

Ingredients

    Raspberry Sauce
  • 2 Tbsp granulated sugar
  • 1 1/2 tsp cornstarch
  • 1/3 cup cold water
  • 1/2 tsp lime or lemon juice
  • 1 1/2 cups fresh or frozen raspberries
  • Cheesecake Mousse
  • 8 oz cream cheese, softened
  • 2/3 cup powdered sugar
  • 2/3 cup heavy whipping cream
  • 1/2 tsp corn syrup
  • 1/2 tsp vanilla extract
  • Graham Cracker Crust
  • 3/4 cup crushed graham crackers
  • 1 1/2 Tbsp packed light-brown sugar
  • 2 Tbsp salted butter, melted
  • 1 fair pinch ground cinnamon

Directions

    For the raspberry sauce:
  • In a small saucepan, whisk together granulated sugar and cornstarch until well blended. Stir in cold water, lime juice and raspberries. Cook over medium heat whisking frequently, until mixture reaches a boil. Allow mixture to gently boil about 5 minutes whisking constantly and reducing temperature slightly if necessary to reduce splattering, until sauce has thickened. Remove from heat and force sauce through a fine mesh strainer into a bowl or airtight container. Cover and refrigerate.
  • For the cheesecake mousse:
  • In a mixing bowl, using an electric hand mixer set on high speed, whip heavy cream until soft peaks form. Add in corn syrup and whip until stiff peaks form, set aside.In a separate mixing bowl, using electric hand mixer set on medium-high speed, whip cream cheese until very smooth and fluffy, about 3 minutes. Mix in powdered sugar and vanilla. Fold half of the whipped cream mixture into the cream cheese mixture and fold until combine, then fold in remaining half of whipped cream. Cover bowl with plastic wrap and refrigerate for 2 hours (or up to 8 hours if needed).
  • For the graham cracker crust:
  • In a small mixing bowl, whisk together crushed graham crackers, light-brown sugar and cinnamon. Using a fork or clean fingertips, blend in melted butter until mixture is evenly moistened. Cover bowl and refrigerate until ready to assemble.
  • To assemble:
  • Note: assemble just before serving for best results. Remove above prepared mixtures from refrigerator. Divide graham cracker mixture among 4 small glasses or dessert cups, pouring about 1/4 cup in each, lightly press into an even layer. Spoon cheesecake mousse into a large Ziploc bag, seal bag and cut a 1-inch edge off one corner of the bag then pipe mousse over graham cracker crusts. Pour raspberry sauce into a small Ziploc bag, seal bag and cut a small tip off one corner, then pipe raspberry sauce over tops. Garnish with mint leaves if desired.
  • Recipe Source: Cooking Classy
Schema/Recipe SEO Data Markup by ZipList Recipe Plugin2.2http://www.cookingclassy.com/2012/12/no-bake-cheesecake-mousse-with-raspberry-sauce/

no bake cheesecake moussetext

no bake cheesecake

Raspberry Truffle Brownies

To contact us Click HERE

raspberry truffle brownies8

Rich brownie lovers, this post is for you. With my mom coming to stay with me for the holidays I knew this would be the perfect dessert to make for her. She’s always been a semi-sweet chocolate lover. I remember growing up she’s the only one in the family that wanted the dark chocolates from the boxes of mixed chocolates. These brownies were certainly a good choice, she simply loved them! In her own words she thought they were “just fabulous.” Surprisingly, I completely loved them and I’m a milk chocolate lover. I was up late Christmas Eve prepping for the following day and I found myself at 2 a.m. continuously heading back for more, cutting little piece after little piece in the middle of the night (side note – to all of you out there that plan ahead and do your Christmas shopping and have it ready a month before, please teach me the secrets of your success =).

Yes, these are incredibly rich but in such a delicious way. I never knew I could love such a richly chocolaty brownie so much because I’ve always been into more of a milk chocolate brownie. The brownies texture is perfectly soft, the truffle filling, which is basically a luscious and velvety smooth frosting, melts in your mouth and the fresh raspberry finish and light sprinkling of cocoa powder just puts these over the top. They would be a perfect dessert to prepare for Valentines Day or just to treat yourself (because in my book, life needs indulging once in a while).

The directions may appear to be long and tedious but these are actually really easy to prepare, you don’t even have to chop chocolate bars as the recipe call for chocolate chips. I adapted this recipe from The Curvy Carrot, she got me with her photo and recipe title. Truffle…chocolate…raspberry…brownie. How could they not be good? I’m definitely in! It’s a combination you won’t want to miss out on. Enjoy!


raspberry truffle brownies6

Print Raspberry Truffle Brownies

Prep Time: 25 minutes

Cook Time: 35 minutes

Yield: 12 servings

Raspberry Truffle Brownies

Ingredients

    Brownie
  • 3/4 cup all-purpose flour
  • 1 tsp cocoa powder
  • 1/2 tsp baking powder
  • 1/4 tsp salt
  • 1 pinch ground cinnamon
  • 1/2 cup butter, cut into 1-inch pieces
  • 1 1/4 cups bittersweet chocolate chips (I used Ghirardelli)*
  • 3/4 cup packed light-brown sugar
  • 2 large eggs
  • 1 1/2 Tbsp milk
  • 1 1/2 tsp vanilla extract
  • Truffle Filling
  • 1 cup semi-sweet chocolate chips
  • 1 (8 oz) pkg cream cheese, softened
  • 1/3 cup seedless raspberry jam
  • 1/4 cup powdered sugar
  • 3/4 tsp raspberry extract
  • Chocolate Ganache
  • 1/3 cup semi-sweet chocolate chips
  • 2 1/2 Tbsp heavy cream

Directions

  • For the brownie:
  • Preheat oven to 350 degrees. In a mixing bowl whisk together flour, cocoa powder, baking powder, salt and cinnamon, set aside. Melt butter along with 1 1/4 cups bittersweet chocolate chips in a microwave safe bowl in microwave on 50% power in 30 second intervals, stirring after each interval until melted and smooth. In a separate mixing bowl using a wooden spoon, mix together light-brown sugar and eggs until well blended. Stir in milk and vanilla, then pour in melted chocolate chip mixture and mix until combine. Slowly add in dry ingredients and mix just until combine. Pour mixture into a buttered 8 by 8-inch baking dish and spread into an even layer. Bake in preheated oven for about 35 minutes, until toothpick inserted into center doesn't come out covered in batter. Remove from oven and allow to cool completely.
  • For the truffle filling:
  • Melt 1 cup semi-sweet chocolate chips in a microwave safe bowl on 50% powder in 30 second intervals, stirring after each interval until melted and smooth, set aside to cool slightly. In a mixing bowl, using an electric hand mixer set on medium speed, whip cream cheese until fluffy, about 2 minutes. Mix in raspberry jam, powdered sugar and raspberry extract. Pour melted chocolate chips into mixture then using a rubber spatula, fold until well combine. Spread mixture over cooled brownies. Cover baking dish tightly with plastic wrap then place in freezer for 15 - 20 minutes to allow truffle filling to set slightly (truffle filling won't ever set fully, mine was still soft and slightly runny but set enough to cut into squares after 15 minutes of freezing. Chill longer to further set if desired).
  • For the ganache:
  • Melt remaining 1/3 cup semi-sweet chocolate chips along with 2 1/2 Tbsp heavy cream in a microwave safe bowl on 50% power in 30 second intervals, stirring after each interval until melted and smooth. Pour mixture into a piping bag or Ziploc bag and cut a small tip off corner. Drizzle over top of brownies (or cut into squares then drizzle over individual squares). If desired, sprinkle top lightly with cocoa powder and a tiny bit of cinnamon, then garnish with a fresh raspberry and mint leaves. Store in an airtight container at room temperature.
  • *If you don't want such a rich chocolate brownie then you can replace the bittersweet chocolate chips with semi-sweet or even milk chocolate chips for the brownie portion. You could also replace the semi-sweet chocolate chips in the ganache with milk chocolate chips.
  • Recipe Source: adapted slightly from The Curvy Carrot
Schema/Recipe SEO Data Markup by ZipList Recipe Plugin2.2http://www.cookingclassy.com/2012/12/raspberry-truffle-brownies/

raspberry truffle brownies9text


20 Aralık 2012 Perşembe

Peppermint Red Velvet Cookies with Peppermint Kisses

To contact us Click HERE

So when was it that peppermint became associated with the color red? Especially considering it comes from green leaves. Not sure who came up with the color choice but for some reason it's as if it were meant to be. If you ask me, the flavors of peppermint should most definitely be associated with the color red. They are vibrant, warm and bold just like the color red, and the obvious answer - the peppermint flavor always reminds me of the Christmas season. This got me thinking that their should be a peppermint red velvet dessert. I saw these cookies on Pinterest (yes another Pinterest find, I'm an addict) and decided to make them in a peppermint version with a slightly more vibrant red for the holidays. I simply reduced the cocoa powdered (and replaced the cocoa powder reduction with flour, hence the + 2 tbsp flour) and replaced the brown sugar with granulated sugar to reduce the brown hues in the cookie and I actually used 1 less tsp of the red food coloring because I didn't think it needed a full tbsp. I also didn't think the cookies needed a full 12 minutes of baking, my first batch was so dry after baking for 12 minutes so the second I cut clear back to 8 and they were perfect. Moist and chewy on the inside and lightly crisp on the outside. Enjoy!


Peppermint Red Velvet Cookies with Kisses
Yields about 3 dozen

Ingredients:
36 Hersheys Peppermint Kisses, Hugs or Milk Chocolate Kisses, frozen*
1 1/2 cups + 2 Tbsp all-purpose flour
2 Tbsp unsweetened cocoa powder
1/2 tsp baking soda
1/2 tsp salt
1/2 cup vegetable oil
1 cup granulated sugar
1 large egg
2 tsp red food coloring
1 tsp white vinegar
1 tsp vanilla extract
3/4 tsp peppermint extract

Directions:
Preheat oven to 375 degrees. In a mixing bowl, whisk together flour, cocoa powder, baking soda and salt, set aside.
In the bowl of an electric stand mixer fitted with the paddle attachment, blend together vegetable oil and sugar on medium speed until mixture is creamy, about 3 minutes. Mix in egg. Add in food coloring, vinegar, vanilla extract and peppermint extract and mix until well blended. With  mixer set on low speed, slowly add in dry ingredients and mix just until combine. Roll dough into balls about 1 scant Tbsp each and place on Silpat or parchment paper lined baking sheets. Bake in preheated oven about 8 - 9 minutes. Remove from oven and allow to cool 30 seconds then lightly press 1 chocolate Kiss onto each cookie and immediately transfer cookies to a wire rack to cool. Allow Kisses on cookies to set at room temperature (or transfer to an airtight container and refrigerate until chocolate has set then return to room temperature before enjoying or enjoy warm out of the oven and slightly melted). Store cookies in an airtight container at room temperature.

*Place in freezer for at least 30 minutes and don't remove from freezer until removing cookies from oven. If using Hugs or Milk Chocolate Kisses I would recommend increasing peppermint extract to a full 1 tsp.

Recipe Source: adapted slightly from Cuisine at Home

Orange Cranberry Chocolate Chip Cookies

To contact us Click HERE
What's my favorite part of the holidays? The food, family, friends and the holiday parties of course! And would there be any holiday parties without the food? The more I become acquainted with food, the more I come to realize how much it has to offer. Not only does it give us the constant nourishment we need to live our daily lives but it brings us together. It builds friendships. It also opens a world of opportunity to experiment with exciting flavors and try new recipes. That's one thing I love about food, it never has to be boring and there are limitless combinations of what can be created.


Another great thing about food is its array of seasonal flavors. I like how there is a rotation of fresh seasonal produce to keep things exciting. Winter can seem to lack quite as much abundance of fresh fruit, but the one fruit I'm glad I can always count on during the Christmas season is the plethora of perfectly ripe, deliciously sweet Navel oranges—the kind that don't lead me to pulling a sour face immediately after sinking my teeth into the first bite. When you really get a good orange, it's so juicy and sweet it could nearly pass as candy.
Oranges are definitely my favorite citrus fruit and their flavor complements a chocolate chip cookie like no other. The citrus-y zip hugs the semi-sweet chocolate chips. These cookies are like those chocolate oranges you buy around the holidays, but in thick and chewy cookie form! Then when you add cranberries into the equation, you'll feel like this cookie is the season’s best friend. If you ask me, cranberry, orange and chocolate were meant to be together.
This cookie is perfect to bake and give as a gift, because how many people do you know that don't like chocolate chip cookies? And how fun would it be to give a chocolate chip cookie that had such a flavorful and exciting twist? I know I'd be happy to get a plateful. Enjoy!


Orange Cranberry Chocolate Chip Cookies
Yields about 2 1/2 dozen
Ingredients:
2 1/2 cups all-purpose flour
2 tsp cornstarch
3/4 tsp baking powder
1/2 tsp baking soda
1/4 tsp salt
1 cup salted butter, softened
1 cup packed light-brown sugar
1/2 cup granulated sugar
2 tsp orange zest
1 large egg
1 large egg yolk
1 tsp orange extract*
1 tsp vanilla extract
1 1/2 cups semi-sweet chocolate chips
1 cup dried cranberries, roughly chopped
Directions:
Preheat oven to 375 degrees. In a mixing bowl, whisk together flour, cornstarch, baking powder, baking soda and salt. In the bowl of an electric stand mixer fitted with paddle attachment, whip together butter, light-brown sugar, granulated sugar and orange zest on medium-high speed until pale and fluffy about 4 minutes. Mix in egg and egg yolk. Stir in orange extract and vanilla extract. With mixer set on low speed, slowly add in dry ingredients and mix just until combine. Mix in chocolate chips and cranberries (if you want them to look like those pictured, I set aside some of the chocolate chips and cranberries to gently press into the top of the cookie dough balls before baking).
Scoop dough out 2 Tbsp at a time and gently roll into balls, then place onto Silpat lined cookie sheets spacing them 2-inches apart. Bake in preheated oven about 10 - 11 minutes. Allow to cool on cookie sheet two minutes before transferring to a wire rack to cool. Store in an airtight container.
*Orange extract can be found near the vanilla extract in most grocery stores or supermarkets.
Recipe Source: Cooking Classy
For more recipes in the 12 Days of Cookies series, follow along on Twitter with the hashtag #BlogHerCookies.
This post is part of the BlogHer 12 Days of Cookies editorial series. Our advertisers do not produce or review editorial content. This post is made possible by Bank of America and BlogHer.

Snowball Cookies

To contact us Click HERE

So where did these cookies originally come from? They are so amazingly good I guess that several different countries want to label them as their own =). What do you call these cookies? Some of the common names for these delicious balls of pure bliss are, Russian Tea Cakes, Mexican Wedding Cookies, Italian Wedding Cookies, snowdrops, butter balls or more specifically pecan butter balls. The name that I think is most fitting is for them is Snowball Cookies, simply put because they look like little snowballs of course. I can understand where the "wedding" and "tea" labels come from because these seem so dainty and fancy, and they'd pair nicely with a warm cup of tea. You'll want to sit in your finest chair and enjoy these cookies with you pinkie fingers up, taking the most delicate little nibbles at a time as you gently dab the excess powdered sugar that falls from the cookie onto your well kept lips with a freshly pressed linen napkin.... Nah! You'll want to just pick up the entire plate of cookies and shove as many as you can fit in your mouth at once =). I absolutely love these cookies and I actually do enjoy savoring each melt in my mouth bite, not in the manor as mentioned above but I think each bite should be enjoyed. 
The snowball/tea/wedding cake/cookie doesn't seem to get the attention it deserves. They are such a classic and maybe it's their old fashioned notion that has pushed them out of the spotlight and to the back burner. These cookies should most definitely not be forgotten and go unnoticed. They are a simple cookie but they have much to offer. Textural wise they are similar to a shortbread cookie but with more dissolve to them (thanks to the cornstarch I added in this recipe I created). Their shortbread portion isn't overly sweet which pairs nicely with the generous coating of powdered sugar they are given after baking. You wont find an overabundance of nuts in this recipe just because I don't like that many nuts in my cookies, but if you do of course you could add in more if you'd like. These cookies are one of my favorites. Easy and simple but delightfully delicious. I love how they also remind me of my Grandma who has passed away because she always made these kind of cookies. She was such a fun and amazing lady. Enjoy!


Snowball Cookies
Yields 2 1/2 dozen

Ingredients:
1 cup salted butter, softened
2/3 cup powdered sugar
1/4 tsp salt
2 tsp vanilla extract
3 Tbsp cornstarch
2 cups all-purpose flour
1/2 cup finely chopped Pecans (I just used Pecan cookie chips so I didn't have to do any chopping, just poured them in right from the bag).
2 cups powdered sugar, for coating

Directions:
Preheat oven to 350 degrees. In the bowl of an electric stand mixer fitted with the paddle attachment, mix butter on medium speed until creamy, about 20 seconds. Blend in 2/3 cup powdered sugar and salt. Mix in vanilla. Sprinkle cornstarch over mixture (just so it doesn't blend into one area) then with mixer set on low speed slowly add in flour and mix just until combine. Stir in Pecans. Scoop dough out 1 Tbsp at a time and roll into a ball, then place balls on Silpat or parchment paper lined baking sheets and bake in preheated oven for 16 - 18 minutes, until bottom edges are lightly golden (these are a cookie that I think are best when they aren't moist in the center so I'd say don't under bake them. These actually are a cookie that are meant to be dry. Dry but a melt in your mouth kind of dry). Remove from oven and allow to cool several minutes then while cookies are still warm, pour 2 cups powdered sugar into a bowl and roll cookies in powdered sugar. Transfer to a wire rack to cool then once cookies are cool, roll in powdered sugar once more, this time to generously coat (I pressed it into the powdered sugar to give it a thick coating. Store cookies in an airtight container.

Recipe Source: Cooking Classy